

 Written by Rana
Setting up IPTV using MyIPTV Player on Windows comes down to 6 steps, install MyIPTV Player from the Microsoft Store, launch the app and grant the necessary permissions, navigate to the playlist section to add a new source, paste your M3U URL or upload the playlist file from your IPTV provider, sync the EPG to enable the live program guide, then test channels and fine-tune the playback settings.
Pairing MyIPTV Player with a reliable IPTV Subscription from a trusted IPTV provider is the simplest way to enjoy stable streams, accurate EPG data, and full guided support throughout the installation.
Whether you’re streaming on a desktop, laptop, or Surface tablet, the installation flow stays the same. Below is the exact path to follow, broken down into six easy stages.
To install MyIPTV Player, start by downloading it from the official Microsoft Store:
Open the Microsoft Store on your Windows PC.
Search for MyIPTV Player in the search bar.
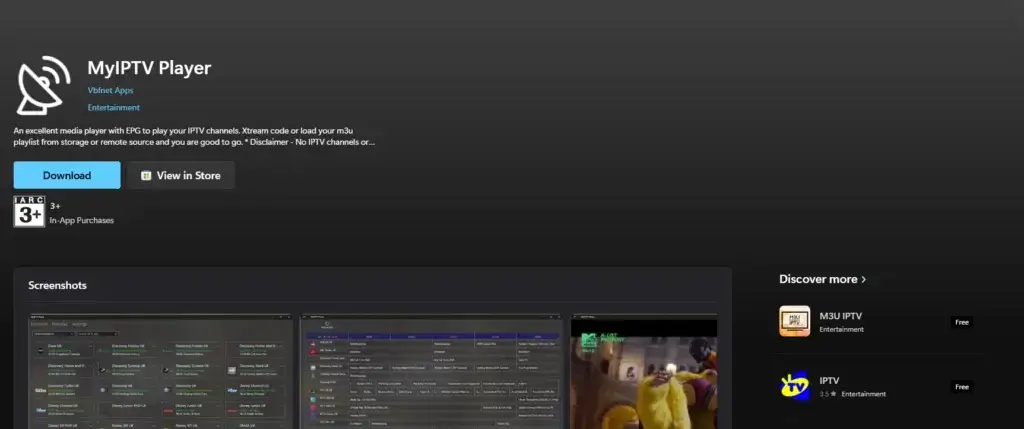
Confirm the developer name to ensure you’re getting the genuine version.
Click Install and wait for the download to complete.
Pin the app to your taskbar or Start menu for quick access.
Launch the app to confirm a successful installation.
Sticking to the Microsoft Store is the safest route. It guarantees you’re getting the verified version of the app, with automatic updates and no risk of bundled malware that often comes with third-party download sites.
Once installed, you’ll need to handle a few quick permissions before configuring anything:
Open MyIPTV Player from the Start menu.
Allow the app to access your local network when prompted.
Grant storage permission for caching playlists and EPG data.
Accept the End User License Agreement (EULA) if it appears.
Adjust regional and language settings if needed.
Wait for the welcome screen to fully load.
These permissions look generic, but each plays a real role — local network access lets the player discover IPTV streams correctly, and storage access enables EPG caching, which is what makes the program guide load instantly instead of refreshing every time.
The heart of MyIPTV Player setup happens in the playlist menu:
Click the Settings icon (gear ⚙️) in the bottom-left corner.
Open the Add new playlist option.
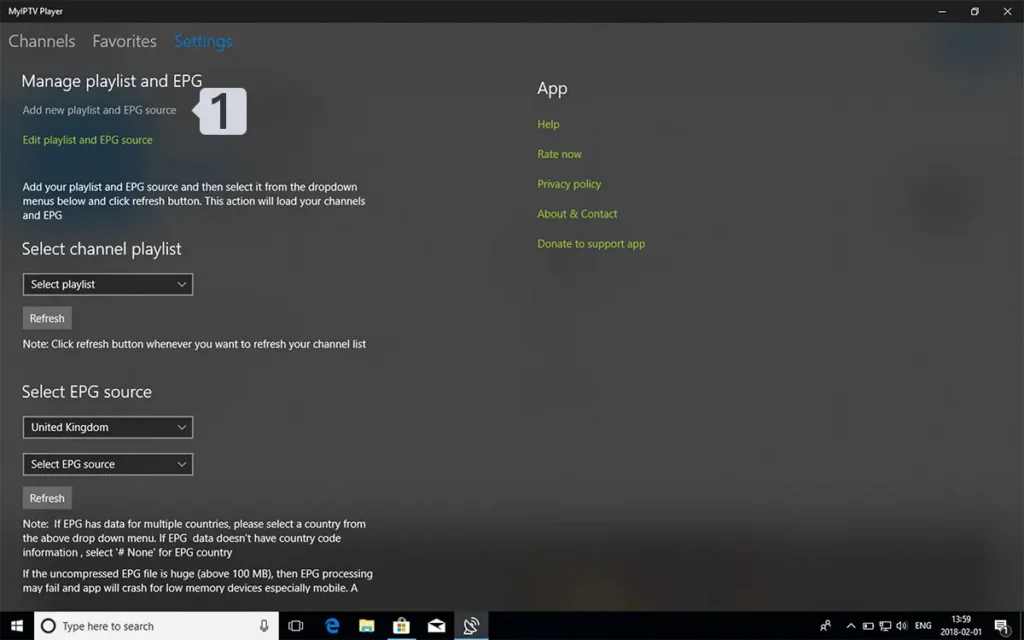
Choose between Remote URL (online M3U link) or Local File (downloaded .m3u).
Give your playlist a memorable name (e.g., “Home IPTV”).
Set the EPG section to a separate URL if your provider supplies one.
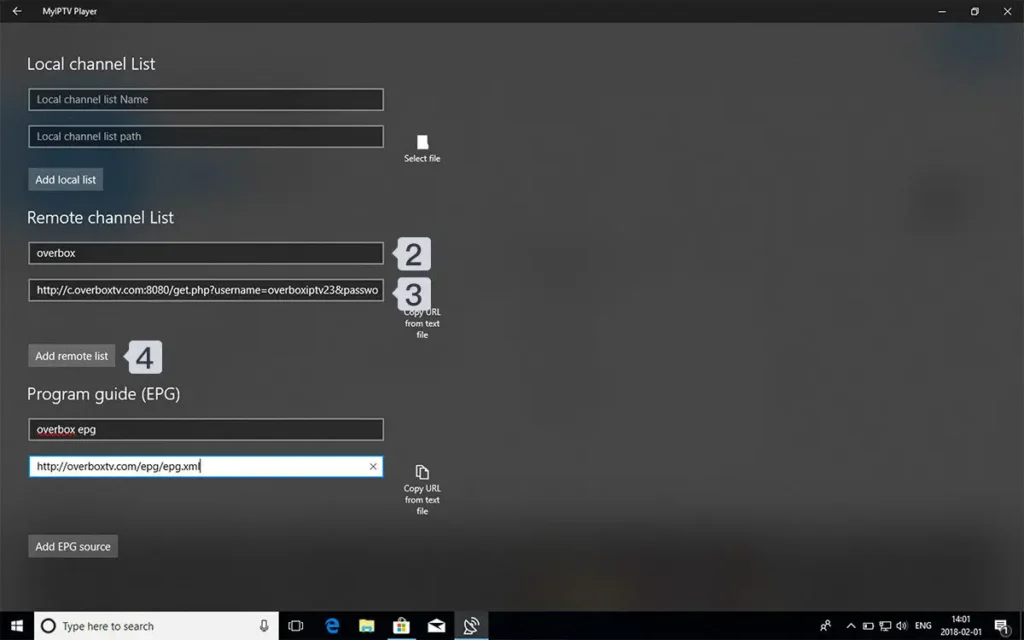
Confirm with Save.
Naming the playlist clearly helps when you eventually add a second one. MyIPTV Player supports multiple playlists, which is useful if you switch between providers or want to test a free trial alongside your main subscription.
Now connect MyIPTV Player to your provider’s source:
For Remote URL: paste the M3U link your provider gave you.
Verify the protocol (http:// vs https://) and the port number.
Avoid extra spaces or hidden characters from copying the URL.
For Local File: click Browse and select the downloaded .m3u file.
Confirm the URL or file path looks correct.
Hit OK to apply.
Even a single misplaced character will block the channel list from loading. According to the Office of the Privacy Commissioner of Canada, only entering credentials and URLs from sources you fully trust is one of the simplest ways to keep your accounts and devices safe online.
A working EPG turns a raw channel list into a real TV experience:
Return to the Settings menu.
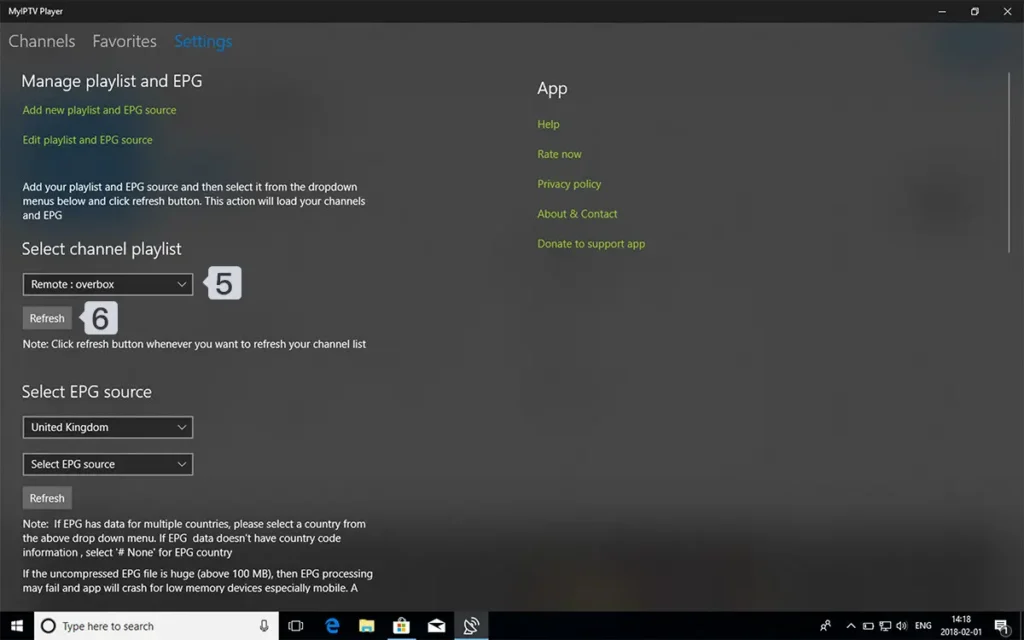
Open the EPG settings section.
Paste the XMLTV URL provided by your IPTV service.
Set the EPG refresh interval to 24 hours for daily updates.
Confirm your local time zone matches the EPG source.
Click Update to manually trigger the first sync.
A correctly synced EPG gives you a fully populated program guide showing what’s on now and upcoming. If your EPG appears empty, double-check the URL, many IPTV providers offer a separate EPG link that you must add manually, distinct from the M3U URL.
Before relaxing into your viewing session, verify everything actually works:
Browse through the loaded channel list and pick a few categories.
Open 3 to 4 channels and confirm they load within 3 seconds.
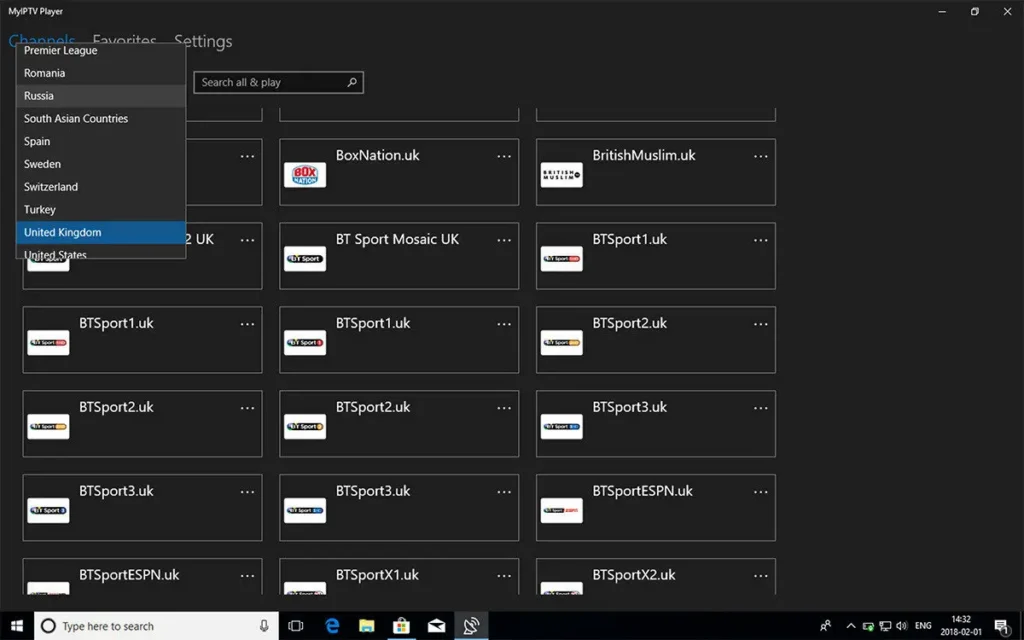
Test channel zapping speed — it should feel near-instant.
Review the EPG to make sure the schedule looks accurate.
Adjust buffer size in playback settings if you experience freezing.
Test during peak hours (7 to 10 PM) for real-world stability.
If channels still struggle to load after a clean setup, the issue is rarely with MyIPTV Player itself — it’s almost always tied to the provider’s server load, an outdated M3U URL, or your internet connection. Identifying the real cause saves a lot of unnecessary troubleshooting.
MyIPTV Player remains one of the most user-friendly Windows-based IPTV solutions, free to install, lightweight to run, and clean to configure. The whole installation flow follows a logical pattern: install, permission, playlist, URL, EPG, and test.
The real difference between a great Windows IPTV experience and a frustrating one isn’t the player you choose, it’s the provider behind the streams. A polished player on a poor service still buffers; a basic player on a stable, well-maintained service runs flawlessly.
Pick your IPTV provider for server stability, transparent licensing, and proper customer support, and MyIPTV Player will deliver smooth, broadcast-quality streaming on virtually any Windows machine you throw at it.
Yes, MyIPTV Player is free to download and use from the Microsoft Store, with no premium tier or subscription cost.
MyIPTV Player runs natively on Windows 10 and Windows 11. It also works on Xbox consoles since they share the same Microsoft Store ecosystem.
Yes. The app supports multiple playlists, which is helpful if you want to compare providers or keep separate accounts for different family members.
The most common causes are a typo in the URL, an expired subscription, or your provider’s server being temporarily down. Verify the URL by pasting it into a browser.
Yes. MyIPTV Player supports XMLTV-based EPG. You’ll typically need to add the EPG URL separately in the Settings menu, alongside the M3U playlist.
No, MyIPTV Player is exclusive to the Microsoft ecosystem (Windows and Xbox). For Smart TVs, you’ll need a different IPTV app like IPTV Smarters Pro or TiviMate.
Freezing usually points to a buffer or codec issue. Try increasing the buffer size in playback settings, or test the same channel on another device to isolate whether it’s a player problem or a provider issue.
This usually points to a time zone mismatch between your PC and the EPG source. Check your Windows time zone settings, then verify the EPG source URL aligns with your local time.
Yes, but the number of simultaneous streams depends on your IPTV provider’s plan. Most reliable providers allow 2 to 5 connections at the same time across different devices.
Updates happen automatically through the Microsoft Store. To trigger a manual update, open the Microsoft Store, click your profile icon, then select Library and check for available updates.
For IPTV specifically, MyIPTV Player is far better than VLC. It includes a proper EPG, channel categories, favorites, and a TV-style interface. VLC works for playing individual streams but lacks proper IPTV features.

Premium IPTV subscription built for Canadian viewers