
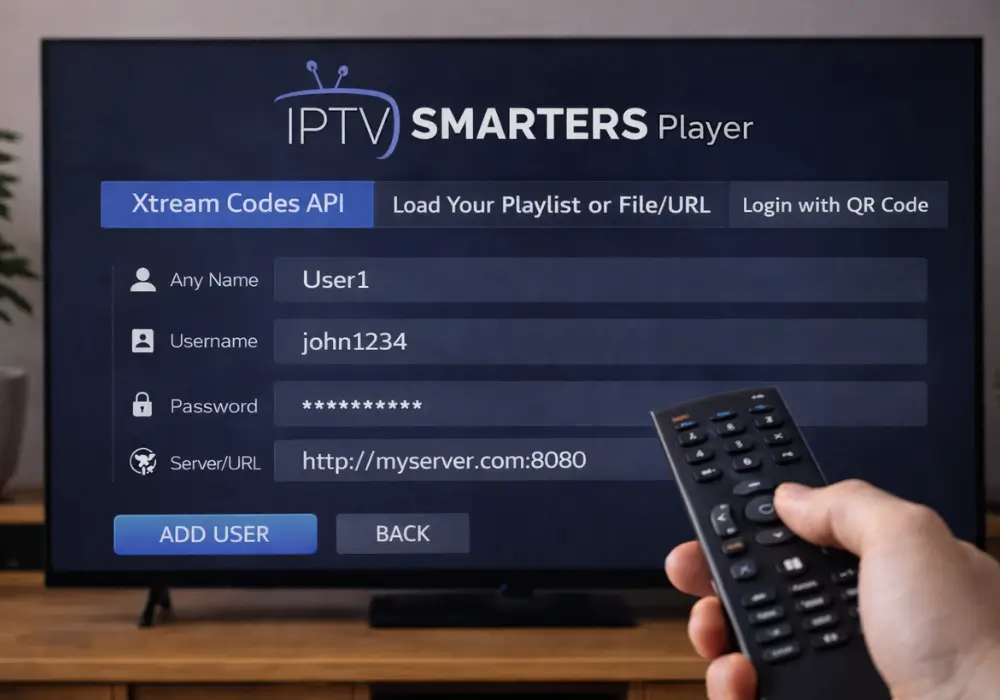
To log in to IPTV Smarters Player, open the app and tap Load Playlist or File/URL. If you’re using Xtream Codes API, enter your server URL, username, and password, then tap Add User. For M3U login, select Login with M3U URL, enter a profile name, and paste your complete playlist URL. Your channels load automatically once connected.
That login screen is identical on every device, so the only thing that changes from one piece of hardware to the next is how you install the app in the first place. This guide covers the login step in full, then the install steps for Firestick, Android boxes and TVs, phones, tablets, iPhone, iPad, Apple TV, Windows, Mac, and Samsung or LG smart TVs. The app itself carries no channels, so it needs credentials from a licensed IPTV Canada provider before anything appears on screen.
1. What You Need Before You Start
Gather four things before you install anything, because almost every failed login traces back to a missing or mistyped detail rather than the app itself:
- Your Xtream Codes credentials, meaning the server URL including its port (for example, http://server.example:8080), a username, and a password. Both the username and password are case-sensitive.
- Or your full M3U link, if that’s the format your provider sent instead. Our guide on where to get your IPTV URL explains what these links look like and where providers publish them.
- The program guide link (EPG or XMLTV) if your provider supplies one separately from the playlist.
- A stable connection, ideally 25 Mbps or more for HD and 50 Mbps for 4K. Evening peak hours between 7 and 10 PM are the real test on most Canadian home connections, so judge your speed then rather than at noon.
IPTV Smarters Pro is a free player and nothing more. It holds no channels of its own and has to be fed by a service you’re actually entitled to use, which in Canada means a provider that holds proper distribution rights for what it carries. No credentials yet? A free IPTV trial issues working Xtream Codes details in a few minutes so you can test the whole setup before paying for anything.
2. The Login Screen: Adding Your Source With Xtream Codes or M3U
Connecting your source works exactly the same way on every device, so this is the one section that applies no matter what you installed the app on. If you haven’t installed it yet, find your device in sections 3 through 8 below, then come back here.
At first launch the app shows a few one-time screens before the login options appear. Accept the licence agreement by ticking the box and pressing Accept or Continue, allow the storage and network permissions it asks for (they’re used to play and record channels), and choose your device type if a Select Device prompt appears, picking Mobile or TV so the layout matches your screen. Then press Add User to reach the login options.
Xtream Codes method (recommended). Press Login with Xtream Codes API, then fill in four fields:
- Any Name, which is just a label so you can recognize this profile later. Anything works.
- Username, exactly as your provider sent it, capitals included.
- Password, again exactly as sent.
- URL, in the format http://server:port.
The port, meaning the number after the colon, is the single most commonly forgotten piece of the whole setup, and leaving it off stops the login cold. Xtream Codes is worth using whenever your provider supports it, since it sorts live channels, movies, and series into proper sections and usually pulls the program guide in automatically.
M3U method. Press Load Your Playlist or File/URL, enter a name in the Any Name field, then paste your full M3U link into the URL field. The link has to start with http:// or https://, with no space at the start or end, which is easy to introduce by accident when copying from an email.
Press Add User to finish. The app then downloads your channel list and VOD data, which takes anywhere from a few seconds to a couple of minutes on the first run. Don’t close it while that’s happening. Once it finishes you’ll land on the main screen with Live TV, Movies, and Series sections ready to browse.
3. Install on Android TV, Google TV, or an Android Box
Install it straight from the built-in Google Play Store, with no sideloading needed on any of these devices. The whole thing takes under a minute:
- From the home screen, open the Google Play Store.
- Select the search icon and type “IPTV Smarters Pro”.
- Choose the app from the results and press Install.
- Press Open once it finishes.
If your device blocks the install, go to Settings, then Device Preferences, then Security & Restrictions, and enable Unknown Sources. For the wider picture on these devices, including Google TV and NVIDIA Shield specifics, see our Android TV setup guide.
4. Install on an Android Phone or Tablet
The process matches an Android box and runs entirely through the official Play Store:
- Open the Play Store on your phone or tablet.
- Tap the search bar and type “IPTV Smarters Pro”.
- Tap Install and wait for the download.
- Tap Open, then allow the storage and network permissions at first launch.
From there, head back to section 2 for the login steps.
5. Install on iPhone, iPad, or Apple TV
On Apple devices the app installs from the App Store in a few seconds, with no advanced steps on any of them.
On iPhone or iPad: open the App Store, tap the Search tab at the bottom right, type “IPTV Smarters Pro”, tap Get, and confirm with Face ID, Touch ID, or your Apple password. Allow local network access if iOS prompts you, since the streams won’t load without it. Our IPTV on iPhone guide covers the wider mobile setup.
On Apple TV: open the App Store from the home screen, go to the Search tab, and type or dictate “IPTV Smarters Lite” using the on-screen keyboard or the Siri Remote mic. The tvOS build is published under the Lite name rather than Pro, which catches a lot of people out, but it’s the same player and takes the same credentials. Select it, press Get, then Open. Our Apple TV setup guide goes deeper on that device.
6. Install on Windows or Mac
Download the installer from the official IPTV Smarters website, since the desktop version isn’t published in the Microsoft Store or the Mac App Store. Always use the official site rather than a mirror, because tampered installers are a real risk with desktop IPTV software.
- Open the official IPTV Smarters site and click Downloads at the top of the page.
- Select the download for your system, Windows or Mac.
- Wait for the file to finish downloading.
- If your browser shows a “download blocked” warning, click it and choose to keep the file.
- Open the downloaded file to launch the installer and let it finish.
A computer works well for watching on a large monitor or alongside other apps, and the login screen afterward is identical to the mobile one. Our IPTV on Windows PC guide covers desktop viewing in more detail.
7. Install on a Samsung or LG Smart TV
Check your TV’s own app store first, since availability depends on the model and the year rather than the brand alone:
- Samsung (Tizen): open Smart Hub, go to Apps, and search “IPTV Smarters” with the on-screen keyboard. Install it if it appears. See our Samsung IPTV guide for the full walkthrough.
- LG (webOS): open the LG Content Store and search “IPTV Smarters” or “Smarters IPTV”. Recent webOS versions usually carry it; older models often don’t. Our LG smart TV guide covers the alternatives.
If the app is missing on your model, you have two options: install a compatible player that is available in your TV’s store and reuse the same credentials, or plug an external box or stick into an HDMI port and install Smarters there instead. The external box route is the more reliable fix on older TVs, and it usually performs better than a built-in smart TV app would have anyway.
8. Install on Firestick or Fire TV
Firestick is the one device that needs sideloading, because the app isn’t published in Amazon’s Appstore. The short version: enable Apps from Unknown Sources under Settings, My Fire TV, Developer Options, install the Downloader app from the Fire TV search, then use Downloader to fetch the official installer address and install from there.
Our Fire Stick IPTV guide carries the complete button-by-button walkthrough for that process, including what to do when Developer Options doesn’t appear on newer Fire TV models. Once the app is installed, come back to section 2 for the login.
9. Manage Profiles, the Program Guide, and Favourites
Open the saved-users list from the home screen to manage more than one source, which is useful if you run separate credentials or several people in the house each have their own. Every source is stored under the label you typed into the Any Name field.
- Press Add User to save an additional source.
- Select any label in the list to switch to that source instantly.
- Hold the selection on an entry, or long-press on mobile, and choose Delete to remove it.
For the program guide and channel organization:
- Open Live TV, land on a channel, and hold the selection or long-press to Add to Favorites.
- In Settings, then General Settings, confirm the EPG is enabled. With Xtream Codes it usually loads on its own.
- If the guide is still empty after a minute, paste your provider’s EPG or XMLTV URL into the settings and refresh. Our EPG guide explains how XMLTV data works.
- Set your time zone in the settings if the listed times look shifted by a few hours.
Favourites cleaned up wrong, or subtitles turning themselves on across every channel? Our guides on clearing favourites and turning off subtitles in IPTV Smarters Pro cover both settings.
10. Optimize Playback and Fix Login Problems
Switch the video player first when a specific channel won’t start, since that single setting resolves more playback failures than anything else in the app. Open the channel’s options and cycle through Internal Player, HW Decoder, and SW Decoder until one works, because different streams use different codecs and no single decoder handles all of them.
For everything else:
- Login rejected? Recheck the server URL, the port, the username, and the password, respecting capitalization. Confirm your subscription is still active before assuming the app is at fault.
- Stuttering or freezing? Switch to Ethernet, or move onto 5 GHz Wi-Fi closer to the router. Our buffering guide and speed requirements guide cover the deeper fixes.
- Interface slowing down? Clear the cache in Settings and restart the app.
- Nothing loads at all, on any channel? That usually points upstream to your provider’s servers rather than your setup. Contact their support.
On privacy, a VPN isn’t required for the app to work, but it helps if your ISP throttles streaming traffic during peak hours. Our guides on adding a VPN to IPTV Smarters Pro and whether you need a VPN for IPTV at all cover when it’s worth the trouble. Connect it at the system level before opening the app, and turn it off temporarily if your provider’s support team can’t identify your account while it’s running.
Frequently Asked Questions
Why can’t I log in to IPTV Smarters?
The usual causes are a mistyped credential, a missing port in the server URL, an expired subscription, or your provider’s server being temporarily down. Check the capitalization on your username and password first, since both are case-sensitive.
Does IPTV Smarters Pro really work on every device?
It covers Firestick and Fire TV, Android boxes and TVs, Android phones and tablets, iPhone, iPad, Apple TV, Windows, Mac, and some Samsung and LG smart TVs. Only the installation method changes between them; the login screen and source setup are identical everywhere.
Do I need a subscription to use the app?
Yes. IPTV Smarters Pro is only a player and includes no channels of its own. You need credentials from a service you’re entitled to use before anything appears on screen.
Why do I have to sideload on Firestick?
Because the app isn’t published in Amazon’s Appstore. Sideloading through the Downloader tool installs it from the official file after you enable Apps from Unknown Sources in the developer options.
Is an M3U link or Xtream Codes better?
Both work, but Xtream Codes is the better choice when your provider offers it. It organizes channels, movies, and series into proper sections and usually loads the program guide automatically, while M3U is simply quicker to paste.
Why is the app called IPTV Smarters Lite on Apple TV?
The tvOS build is published under the Lite name rather than Pro. It’s the same player and takes exactly the same Xtream Codes or M3U credentials, so search for Lite on Apple TV and Pro everywhere else.
The program guide won’t show, what should I do?
Give it a minute after the channels finish loading. If it stays empty, paste your provider’s EPG or XMLTV URL into the settings, confirm the EPG is enabled, then refresh. If the times look wrong rather than missing, correct your time zone instead.
A channel freezes or won’t start, how do I fix it?
Open that channel’s options and switch the video player between Internal Player, HW Decoder, and SW Decoder. Codec mismatches cause most single-channel failures, and one of the three almost always works.
What internet speed do I need?
At least 25 Mbps for HD and closer to 50 Mbps for 4K, measured during evening peak hours rather than midday. Stability matters more than headline speed, so a wired connection beats a faster but patchy Wi-Fi signal.
Conclusion
Getting IPTV Smarters Pro running is two separate jobs, and only one of them changes from device to device. The install varies (sideloading through Downloader on Firestick, the Play Store on Android, the App Store on iPhone, iPad, and Apple TV under the Lite name, the official installer on Windows and Mac, and the built-in store on Samsung and LG), but the moment the app opens, every device shows the same login screen and takes the same Xtream Codes or M3U details. Enter them carefully, remember the port after the colon in the server URL, and the app pulls in your channels, guide, and content on its own.
After that it comes down to habits rather than settings: organize your favourites early, set your time zone so the guide reads correctly, and switch the video player before assuming a channel is broken. The player is only a tool, so the quality of what you actually watch depends on the service behind it and the stability of your connection. Pair a licensed provider with a wired connection on the main TV and you’ll get clean, consistent playback across every screen in the house.