How to Turn Off Subtitles on IPTV Smarters Pro ?
Turning off subtitles on IPTV Smarters Pro takes 6 steps: open the app and start playing any channel, access the player settings during playback, locate the CC or subtitle option, select “Off” or “None,” adjust subtitle settings globally, then save and restart the stream.
The process works the same on Android, iOS, Firestick, and Smart TVs. If subtitles still appear after disabling, they may be hard-coded into the stream, a sign of a quality issue with your IPTV provider rather than the app.
Knowing how to turn off subtitles on IPTV Smarters Pro is one of the most searched customization topics among IPTV users. Whether you’re watching live TV or VOD, unwanted text on your screen kills the viewing experience fast.
According to the CRTC, Canadian broadcasters maintain closed captioning standards, which is why CC tracks are common across IPTV streams in Canada.
Step 1 — Open IPTV Smarters Pro and Start Playing Any Channel
Before diving into the settings menu, you’ll need to get a channel playing first. The subtitle controls in IPTV Smarters Pro only appear once the player is active, so launch the app, browse to any live channel or VOD title, and hit play.
On touchscreen devices (phones and tablets), tap anywhere on the screen while content is playing to reveal the player overlay, the control bar that sits across the bottom.
Look toward the bottom-left or bottom-right corner for a “CC” icon or a speech-bubble subtitle icon. Tap it, and a track list will appear. Select None or Off to disable subtitles immediately.
On Smart TVs and remote-controlled devices, press the Select, OK, or Enter button on your remote while a channel is playing. This triggers the same overlay. Navigate using the directional pad to highlight the CC or Subtitle icon, then press OK.
Choose None from the subtitle track list to clear the text from your screen.
This in-player method works for individual sessions. For permanent removal across every channel, the player settings menu is where the change actually sticks, and that’s exactly what Step 2 walks you through.
Step 2 — Access the Player Settings During Playback
With your channel up and running, it’s time to dig into the player controls. This is where most users get stuck, the subtitle toggle isn’t sitting on the main dashboard. It only appears while content is actively playing, which is a common source of confusion.
Here’s how to navigate to it:
Tap or click anywhere on the screen while content is playing to reveal the player overlay controls.
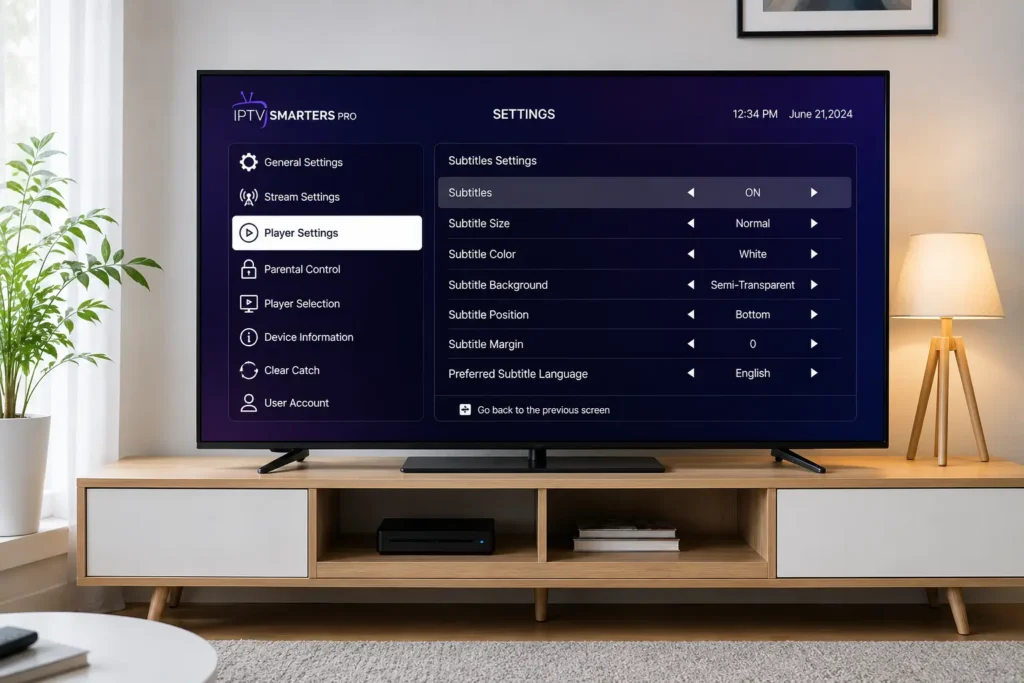
Look for the Gear Icon (⚙️) — typically located in the top-right or bottom-right corner of the player interface.
Toggle the Disable Subtitle switch to On.

The phrasing is a little counterintuitive, turning “disable” to “on” means subtitles are turned off. The real advantage: once you flip that switch, the setting applies globally to all future content automatically. You won’t need to repeat this process every time you switch channels.
This is the most reliable method for disabling subtitles across all content types, live TV, VOD, and series episodes included.
Step 3 — Locate the Subtitle (CC) Option in the Player Menu
Now that you’ve opened the player controls, the next task is finding the actual subtitle or Closed Caption (CC) toggle. The location shifts depending on your device.
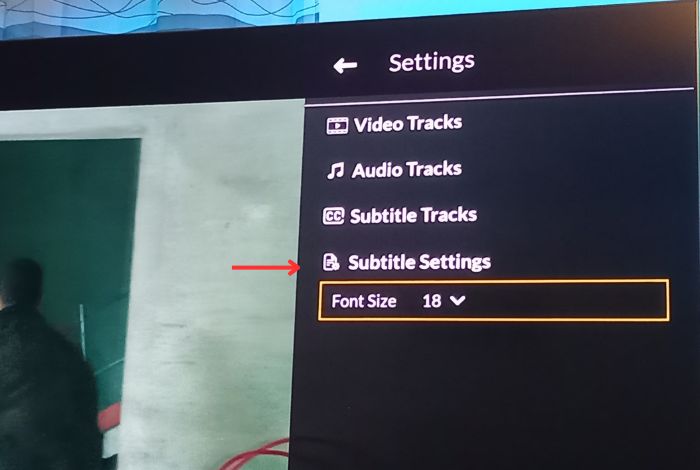
On Firestick, press the Menu button (the icon showing three horizontal lines) on your remote while video is playing. This triggers a subtitle tray to slide up from the bottom of the screen. Look for a “CC” or “Subtitles” label within that tray — easy to overlook if you’re not watching for the overlay animation. Tap it once to expand the subtitle language options.

On Samsung Tizen Smart TVs, navigate to the player toolbar at the bottom of the screen using your directional pad, then select the speech-bubble or CC icon.
On LG webOS, the subtitle menu may appear as a separate panel, some app versions bury this option under an overflow or settings icon rather than the main toolbar.
Finding the CC option is the critical step, everything after this depends on what choices the menu actually presents to you, which leads directly into how to handle both standard and problematic subtitle situations.
Step 4 — Select “Off” or “None” to Disable Subtitles
With the CC menu located, the fix should be as simple as selecting Off or None from the subtitle options. In most cases, that’s exactly what happens — the text disappears immediately. However, if subtitles persist after making that selection, you’re likely dealing with a different problem entirely.
Hard-coded subtitles are text elements burned directly into the video stream by the content provider. They’re not a separate track you can toggle, they’re baked into the picture itself. The telltale sign? Your CC menu shows “None” or no subtitle tracks available, yet text still appears on screen. No setting inside Smarters Pro can remove these, because they’re technically part of the video image.
One practical workaround is routing playback through an external player such as VLC or MX Player, both supported within Smarters Pro’s settings.
These players occasionally handle subtitle layers differently depending on the stream format. However, hard-coded subtitles ultimately come from upstream — meaning the issue lives with your IPTV provider’s stream quality.
Step 5 — Adjust Subtitle Settings Globally
Turning subtitles off channel by channel works, but there’s a smarter approach. Adjusting IPTV Smarters Pro’s subtitle settings at a global level saves you from repeating this process every time you switch streams.
Two practical moves:
- Add favorites for subtitle-free channels: Navigate to any channel, press and hold (or right-click), and select Add to Favorites. This builds a curated list of channels you’ve already configured, no subtitle surprises.
- Customize your dashboard: Pin your Favorites category to the top of the home screen for faster access. Fewer clicks means less chance of landing on an unconfigured stream.
A clean checklist for a subtitle-free interface:
- Subtitles set to Off in the player menu.
- Preferred channels added to Favorites.
- Dashboard reorganized with Favorites front and center.
- Audio track confirmed as your default language.
A well-organized IPTV dashboard isn’t just convenient, it actively prevents settings from reverting when you jump between channels or restart the app.
Step 6 — Save Your Settings and Restart the Stream
Once you’ve toggled subtitles off, don’t just close the menu and assume the job is done. Saving your settings correctly is the step most users skip, and it’s often why subtitles reappear the next time a stream loads.
In IPTV Smarters Pro, some changes apply instantly while others require confirmation. If you see a Save or Apply button in the settings panel, tap it before navigating away. Skipping this step essentially discards your changes.
After saving, take one more action: fully restart the stream. Stop playback, exit the channel completely, then relaunch it. This forces the player to reload with your updated preferences rather than pulling from a cached session state. A clean restart is the single most reliable way to confirm subtitle changes have actually taken effect.
If text still appears after a full restart, the issue is upstream, the stream itself carries hard-coded subtitles. That’s a sign your IPTV provider’s stream quality may need an upgrade.
Conclusion
Subtitles that appear uninvited are one of those small annoyances that quietly ruin an otherwise great streaming experience. The good news? Turning them off in IPTV Smarters Pro is entirely doable once you know where to look.
To recap: disable subtitles directly within the player during playback, adjust your global subtitle settings to prevent them from reactivating on new channels, and always save your settings before exiting. If the toggle doesn’t stick, a stream restart typically resolves the issue. If subtitles still appear after every fix, the problem isn’t your app, it’s your stream source.
A clean, distraction-free picture is only a few taps away, regardless of whether you’re on Android, iOS, Fire TV, or a Smart TV. In practice, most users resolve this in under two minutes once they follow the correct sequence.
A reliable IPTV subscription with properly encoded streams won’t deliver hard-coded subtitle issues in the first place.
Frequently Asked Questions
Why do subtitles keep turning back on after I disable them?
This is the most common complaint. The issue usually stems from not saving settings before closing the player, or from your IPTV provider embedding forced subtitle tracks in the stream itself. Always confirm the toggle is off before exiting the menu, and if subtitles persist on specific channels, the problem is likely on your provider’s end.
Does turning off subtitles affect all channels or just the current one?
It depends on your device and app version. Some builds apply the change globally; others reset per channel. Using the global Disable Subtitle toggle (Step 2) is the most reliable way to prevent subtitles across all content.
Can I disable subtitles on a Samsung or LG Smart TV using IPTV Smarters Pro?
Yes — the Samsung and LG processes follow the same in-player steps, though TV remote navigation makes the menu feel different. The CC icon is typically in the player toolbar at the bottom of the screen.
What if there’s no subtitle toggle visible in my player?
Update the app. Missing controls are almost always a sign of an outdated version lacking full subtitle management features.
My subtitles won’t turn off no matter what I try — what now?
This usually means the subtitles are hard-coded directly into the video stream by your provider. No app setting can remove them. Switching to a reliable legal IPTV provider with properly encoded streams typically solves the problem permanently