
How to Install IPTV on Dreamlink T1, T1+, T6 ?
To install IPTV on a Dreamlink T1, T1+, or T6, power on the box and let it update, open the Dreamlink Online (DOL) app, note the MAC address shown in the top-right corner and send it to your provider, then enter your portal name and portal URL under Settings and restart: your channels load automatically.
Dreamlink boxes are dedicated IPTV set-top boxes that connect to a portal using your MAC address, much like MAG and AVOV boxes. For everything to work, you’ll need a reliable IPTV Subscription, a legal service from a licensed provider — that registers your MAC address and supplies your portal URL. This guide walks you through all ten steps, from plugging in the box to troubleshooting.
On Dreamlink, open the DOL app, note the MAC address (top-right), send it to your provider, then enter the portal name and URL under Settings and restart. Your channels appear on their own afterward.
1. Understand What the Dreamlink T1, T1+, and T6 Are
Before you start, it helps to know how Dreamlink boxes work, because it shapes the whole setup. The T1, T1+, and T6 are set-top boxes built specifically for IPTV, with the T6 being the newest and most powerful of the lineup.
They run a dedicated system and connect to a portal through their built-in app, Dreamlink Online (DOL), using your MAC address. The three models differ in hardware, but the setup logic is identical.
- The Dreamlink T1, T1+, and T6 are dedicated IPTV set-top boxes.
- They connect to a portal using a URL and your MAC address.
- The built-in portal app is called Dreamlink Online (DOL / DOL2).
- All three models follow the same setup steps.
2. Gather Your Equipment and Prerequisites
Most setup failures come from a missing item at configuration time. Take a few minutes to gather everything before plugging anything in. Above all, you’ll need an active subscription and the details supplied by your provider.
- Have the Dreamlink box, its remote, and its power supply ready.
- Get an HDMI cable and an Ethernet cable (or a Wi-Fi connection).
- Keep the portal URL emailed to you after your order within reach.
- Note your box’s MAC address (see Step 6).
3. Connect the Dreamlink Box to Your TV and Network
The physical connection is simple, but your network connection will determine how smoothly everything plays. For a fixed box hooked up to a large screen, a wired Ethernet cable is always preferable to Wi-Fi, especially in 4K. Make sure everything is properly connected before powering on the device.
- Connect the box to your TV with the HDMI cable.
- Plug in the Ethernet cable, or get the Wi-Fi connection ready.
- Insert the power supply and turn the box on.
- Select the correct HDMI input on your TV.
4. Power On and Update the Box
On first boot, the box should download any available updates before you configure anything. Keeping it up to date ensures better performance and IPTV compatibility. This quick step prevents many issues down the line.
Let the box boot up fully.
Go to Settings > System Update.

Install any available updates and let the box restart if needed.
Confirm the box is connected to the internet.
5. Open Dreamlink Online (DOL)
Dreamlink uses its own portal app, called Dreamlink Online (DOL or DOL2), to connect to your service. On most boxes it opens automatically at startup; if not, you may need to install it first. This app is where you’ll find your MAC address and enter your portal details.
From the home screen, open “My Apps” and select Dreamlink Online (DOL2).
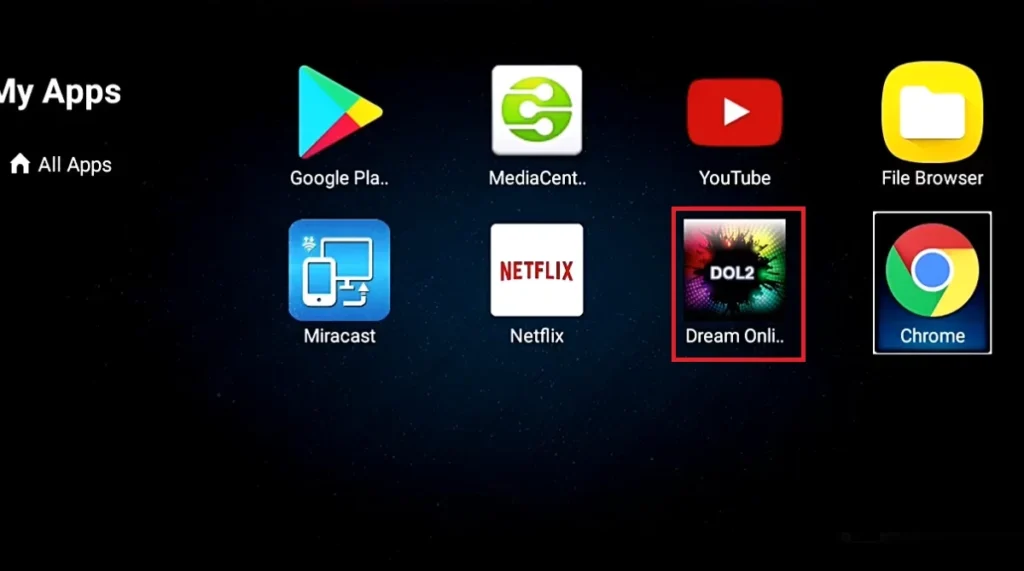
If DOL2 isn’t there, open the “Market,” find it, and install it.
Let the app load to the server/service menu.
Press Exit, then OK, to reach the main DOL screen if prompted.
6. Find the MAC Address in DOL
The MAC address is your box’s unique identifier; your provider needs it to activate your subscription on that specific device. It’s displayed right inside the DOL app. Write it down carefully, you’ll use it in the next step.
On the main DOL screen, look at the top-right corner.
The MAC address appears there, usually starting with 00:1A:79:.
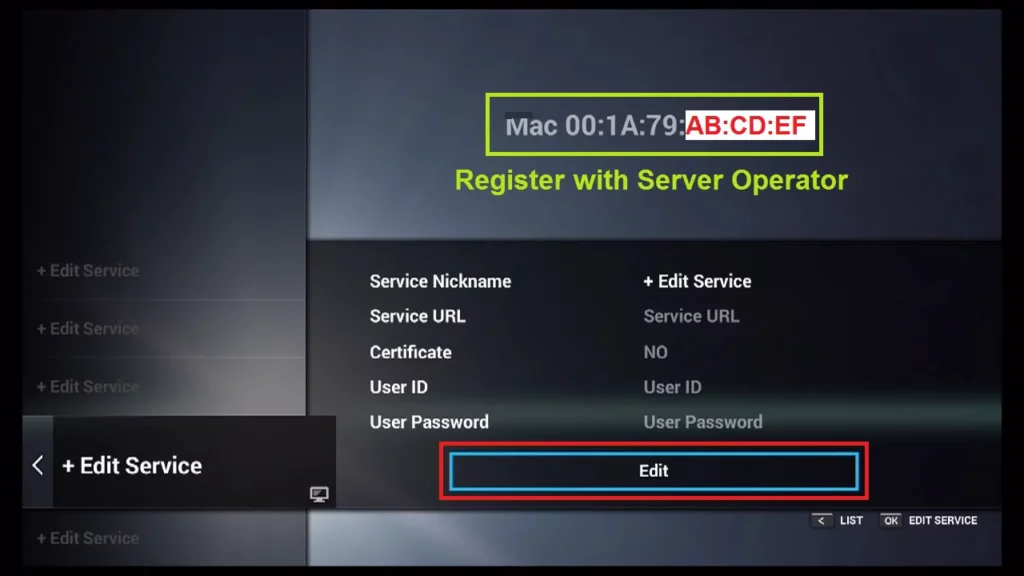
Note the full address exactly as shown.
Keep it handy for activation with your provider.
7. Send Your MAC Address to Your Provider
This is the key step for portal-based boxes: your provider must register your MAC address on their server for the subscription to work. You’ll typically enter it during checkout when you order. Without this activation, the portal will stay empty.
Provide your MAC address to your provider (at checkout or by email).
Wait for confirmation and for your personalized portal URL.
The portal URL usually arrives by email a short time after ordering.
Double-check that the MAC was entered correctly on their side.
8. Enter the Portal Name and URL
Once your MAC address is registered and you have the portal URL, all that’s left is entering it in DOL. This is where the box connects to your service. Type the address exactly as provided, because a single typo will stop it from loading.
In Dreamlink Online (DOL), go to “Settings.”
Press the Green button on the remote to bring up the Edit option.
Enter a portal name (any name you like)
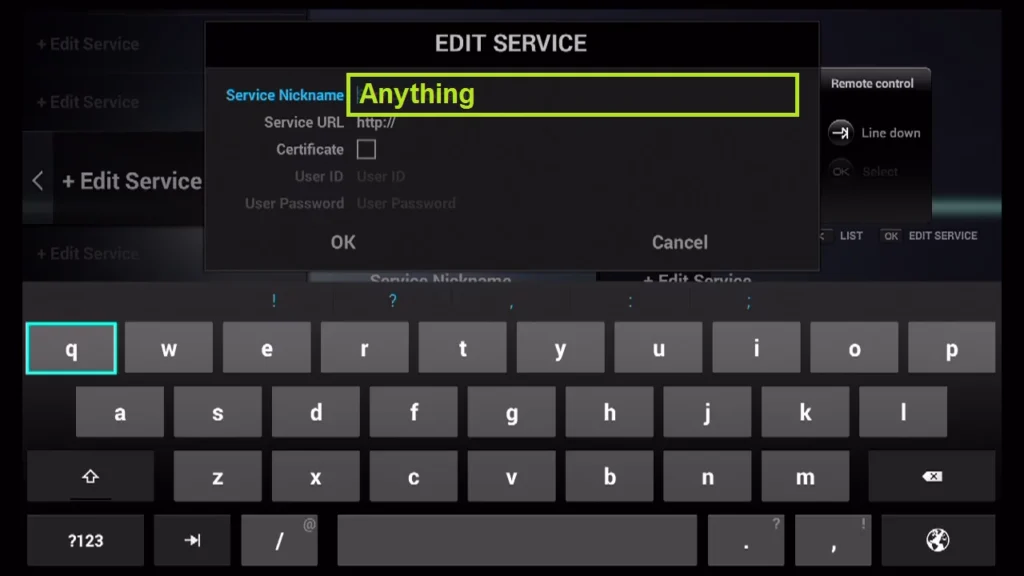
And the portal URL from your email.
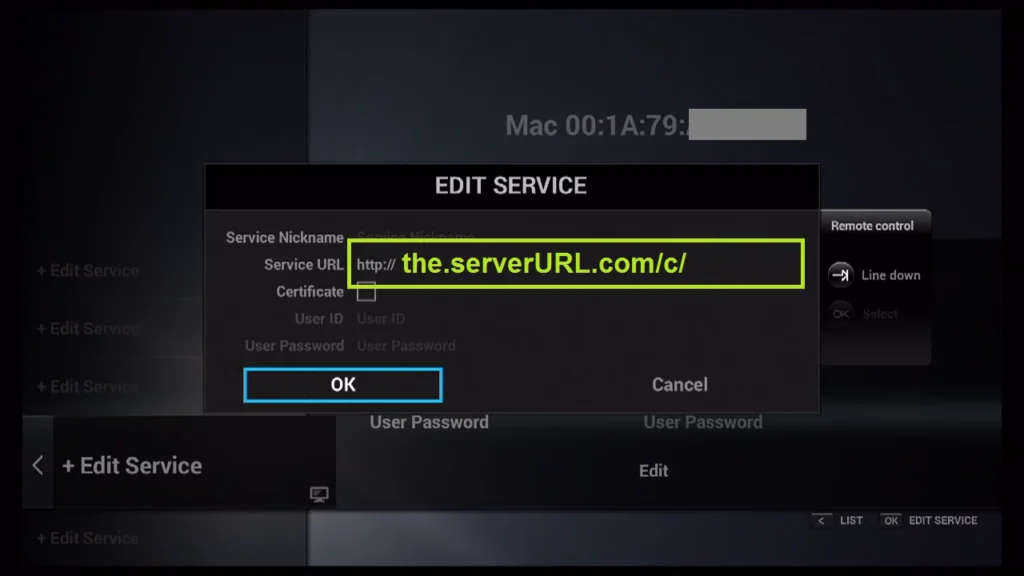
Double-check every character, then confirm.
9. Confirm, Restart, and Load Your Channels
For the new configuration to take effect, the box needs to reload the portal. A simple restart is enough in most cases. This is the moment your channels should finally appear, so take a minute to check everything works.
Confirm your settings and restart the Dreamlink box.
Wait while the portal loads.
Open the live channels list and test a few of them.
Check the Movies and Series (VOD) sections and the program guide (EPG).
10. Optimize, Secure, and Troubleshoot
A few final adjustments ensure smooth playback and fix the most common issues, like a black screen or buffering. Connection stability remains the deciding factor. If the box still misbehaves after the basics, our guide on why your IPTV box might not be working covers the deeper fixes.
- Aim for at least 25 Mbps for HD and 50 Mbps for 4K.
- Use Ethernet if the picture freezes or buffers.
- If the portal is empty, restart the box and the router, then recheck the URL and MAC activation.
- Keep the box updated from Settings > System Update.
Frequently Asked Questions (FAQ)
What are the Dreamlink T1, T1+, and T6?
The Dreamlink T1, T1+, and T6 are set-top boxes designed specifically for IPTV streaming, popular in Canada for their stability and easy-to-use interface. The T1 was the first generation with 4K support, the T1+ improved on its hardware, and the T6 is the newest and most powerful model. Despite their hardware differences, all three share the same setup procedure based on the Dreamlink Online (DOL) app. This makes the instructions in this guide valid across the whole lineup.
What is Dreamlink Online (DOL) and why do I need it?
Dreamlink Online, often shown as DOL or DOL2, is the box’s built-in portal application. It’s the bridge between your Dreamlink box and your provider’s server: it displays your MAC address and lets you enter your portal details.
Without it, the box has no way to connect to your IPTV service. If it isn’t already installed, you can add it from the box’s Market, after which it appears in your My Apps folder.
Why does my provider need my MAC address?
The MAC address is your box’s unique identifier, comparable to a license plate. Your provider uses it to link your subscription to that exact device and authorize access to their portal.
Until this address is registered on their server, the box will show an empty portal even if the URL is correct. That’s why most providers ask for it during checkout — so your device is ready to go when your portal URL arrives.
The portal is empty or won’t load — what should I do?
First, make sure your MAC address has been activated by your provider and that your subscription is valid; activation can take a little time after ordering.
Next, check that the portal URL was entered exactly as provided, with no spaces or typos. Then verify your internet connection in the settings. A quick restart of both the Dreamlink box and your Wi-Fi router resolves many cases; if it persists, contact your provider’s support.
What internet speed do I need for a Dreamlink box?
For smooth, uninterrupted HD playback, plan for at least 25 Mbps, and at least 50 Mbps for 4K. Beyond raw speed, connection stability matters most: a wired Ethernet link almost always outperforms Wi-Fi on this kind of fixed device. If several devices use the network at the same time, add up their needs to avoid congestion and dropouts.
Can I use apps like IPTV Smarters on a Dreamlink box?
Yes. Because Dreamlink boxes are built on an Android-style system, you can also install apps such as MyTVOnline 2 or IPTV Smarters Pro from the box’s app store and log in with Xtream Codes or an M3U playlist.
That said, the DOL portal method described in this guide remains the standard, most seamless option for Dreamlink hardware. The app route is mainly useful if your provider supplies Xtream Codes or M3U links instead of a portal.
Is IPTV on a Dreamlink box legal in Canada?
The Dreamlink box itself is a perfectly legal device — it’s hardware like any other. Legality depends entirely on the service you connect it to. As long as you use a licensed provider that holds the broadcasting rights to its content, you’re in the clear.
Unlicensed services, by contrast, expose their operators to serious legal consequences in Canada — the RCMP has helped crack down on illegal streaming operations, with operators handed prison sentences, as reported by CTV News. Be wary of offers promising thousands of premium channels for a few dollars — a classic sign of an unauthorized service.
Conclusion
Installing IPTV on a Dreamlink T1, T1+, or T6 is straightforward once you follow the steps in order: connect the box, update it, open Dreamlink Online, find the MAC address, have your provider activate it, then enter the portal name and URL before restarting.
The whole process rests on the MAC address + portal pairing, and the same method works across all three models.
Once you understand this mechanism, setup takes just a few minutes and stays stable over time. Keep in mind that the box is only a tool: the quality, stability, and legality of your experience depend on choosing a reliable subscription from a licensed provider.
With a good connection and a trustworthy service, your Dreamlink box will deliver smooth viewing on the big screen.